为什么我们要打包源代码

盘古开天之际,我们是不需要打包代码的,直接执行即可……

咳咳,走错片场了。但道理是一样的,当计算机还是由纸带驱动时,什么程序和数据都是混杂在一个个空洞之上,像挂面一样,没法打包,或者说压缩。直到区分了处理器和存储器,才有了汇编指令,程序才变得像意大利面一样曲曲折折,千转百回。

今天我们组的实习生突然提到了 B/S 架构,突然联想到之前的单体发布应用,加上目前对于 WebAssembly 等胶水层和大大小小各种容器技术的理解,想对编译打包这个过程做一点分析。任何产品,哪怕是数字产品,所追求的永远是多快好省,在更新频率要求很低的 90 年代,发放软件的方式可以是光盘💿甚至软盘💾,每次更新升级都需要插入磁盘驱动执行更新程序,这在当下点一点就能升级的体验是天壤之别了。用户的体验升级也意味着开发模式的进步,从复杂的单体架构(dll -> exe),变成了松散分布的依赖包共同组织成一个完整的应用(npm -> exe)。甚至无代码开发的时候,某些重型库或包的大小已经超出了一般的应用程序,这时如何将它们有机地组合在一起,将不多也不少刚刚好的应用交付给用户,就成了开发人员需要解决的难题。

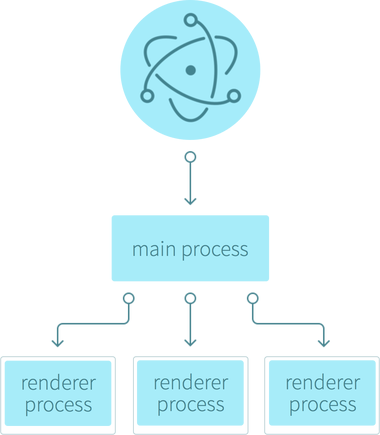
熟悉前端的朋友应该知道,JavaScript 的加载经历了纯 script 引用加载 - AMD 异步依赖的刀耕火种时期,直到 2012 年 Webpack 横空出世,才解决了打开一个页面需要加载成千上百个 js 文件的困境。这是 HTTP 1.x 的弊病所导致的,当然这个时期 JavaScript 的作用大多限于提升页面丰富度,随着 node.js 的应用,越来越多的与系统相关的包进入 npm,它们活跃在 node.js 层,却无法被浏览器使用,怎么办呢?一个办法是在浏览器里模拟操作系统,就是虚拟机,这个肯定性能有问题,pass,或者就是把系统相关的接口阉割掉,只保留计算部分,这就是 WebAssembly:将程序编译成字节码在浏览器里以汇编运行,实现了浏览器编译能力的升华;另一个办法,是把浏览器和 node.js 环境捆绑打包起来,这就是 Electron!

个人觉得 Electron 最精髓的应用不在于可以把网页打包成桌面应用,当然也是赋予了它很多桌面应用才有的功能,比如数据库以及和系统交互的能力。最重要的是引入了 B/S 架构以后,代码的打包阶段可以被分块分层,从而使开发和构建过程各取所需,一个预想的未来是可以基于 Electron 做下一代编辑器(Visual Studio Code++ …… 大误,逃)集成了从服务端到浏览器端的全链路。当然目前比较有用的是可以选择性地不打包一些库

开发时工具不用打包

用于开发时自动重启的 electron-connect 是不用打包到生产环境的。可通过配置

1
2
3
4
// main-process/window
if (process.env.NODE_ENV === 'development') {
require('electron-connect').client.create(window)
}
1
2
3
4
5
6
7
8
9
10
11
12
13
14
15
// rollup.config
import replace from '@rollup/plugin-replace'
const config = {
plugins: [
replace({
'process.env.NODE_ENV': JSON.stringify(process.env.NODE_ENV)
}),
...
],
external: [
'electron',
'electron-connect',
],
...
}

来避免打包,在开发环境里用 node_modules 里的就好啦。

重型依赖只在生产环境下打包

像 RxJS 这种重型依赖,编译打包一遍耗时巨大,我们可以把它也排除在外,具体配置如下

1
2
3
4
5
6
7
8
9
10
11
12
13
14
15
16
17
18
19
20
21
22
23
24
25
26
27
28
29
30
31
32
33
34
35
36
37
38
39
40
41
42
43
44
45
46
// rollup.config
import html from 'rollup-plugin-html2'
import copy from 'rollup-plugin-copy'

const useBundledRx = process.env.NODE_ENV === 'development'
const rendererConfig = {
...common,
plugins: [
...common.plugins,
html({
externals: [
...(useBundledRx ? [{
type: 'js',
file: "../assets/rxjs.umd.min.js",
pos: 'before'
}] : []),
]
}),
],
output: {
globals: {
electron: "require('electron')",
...(useBundledRx ? {
rxjs: 'rxjs',
'rxjs/operators': 'rxjs.operators',
} : {}),
},
},
external: [
'electron',
...(useBundledRx ? ['rxjs', 'rxjs/operators'] : []),
],
}

const mainConfig = {
plugins: [
copy({
targets: [
...(useBundledRx ? [{
src: path.join(projectDir, 'node_modules/rxjs/bundles/rxjs.umd.min.js'),
dest: path.join(outDir, 'assets'),
}]: [])
],
})
],
}

开发环境打包流程如下:

  1. copy node_modules 下的 rxjs umd 文件至输出目录
  2. 渲染进程打包文件,排除掉 rxjs,并设置其为全局依赖(window.rxjs)
  3. 在 html 中引入拷贝过去的 umd 文件

避免无谓的打包,把优化用在刀刃上

这样以后,开发环境将不在打包 rxjs,而生产环境下做 tree-shaking 之后直接和业务代码合成一块,在本机加载的基础上更进一步缩小体积,利于解析。实际上,Electron 将大部分的包都直接打进 exe 文件都不会太大影响,只是为了项目目录整洁,我们还是选择尽可能多的用 bundle 过的包,无论是 npm 打包的还是我们自己 bundle 的。

Electron 踩坑

来鹅厂做了俩常规项目(更新文件上传方式至 COS 及修改移动端顶部 UI)后参与了文档 App 的桌面 Electron App 开发,在 UI 层上又是一个坑接一个坑。主要有下述几点:

  • 实现适应于内置 React 组件大小的 BrowserWindow,同时保证首次加载时页面不会错乱
  • 使自定义弹窗可拖拽并且内部表单组件可使用
  • BrowserWindow 内弹出超出 Window 范围的菜单
  • 跨端编译打包后发现 runtime 对不上

使 BrowserWindow 自适应 React 组件

我们知道 ElectronBrowserWindow 的默认尺寸为 800 × 600,虽然可以初始化设置弹窗大小,但是并不知道弹窗内容尺寸呀!于是乎,需要先隐藏弹窗直至 compsnentDidMount 时获取到 dialog 内容尺寸再设置 BrowserWindow 的大小并显示。

1
2
3
4
5
6
7
8
9
10
11
12
// main-process 打开弹窗
import { ipcMain } from 'electron'

export function openDialog() {
const dialog = new BrowserWindow({
show: false
})
ipcMain.once('dialog-did-mount', () => {
dialog.show()
})
}

1
2
3
4
5
6
7
8
9
10
11
12
13
14
15
16
17
// renderer 页面在组件加载后设置宽高并返回消息显示 window
import React, { useEffect, useRef } from 'react'
import { ipcRenderer, remote } from 'electron'

export default function Dialog() {
const dialogRef = useRef()
useEffect(() => {
const window = remote.getCurrentWindow()
const { clientWidth, clientHeight } = dialogRef.current
window.setSize(clientWidth, clientHeight, true/* animate */)
window.center()
ipcRenderer.send('dialog-did-mount')
})
return <div ref={dialogRef}>
contents...
</div>
}

拖拽窗口

官方解答
遇到的坑是设置好 dialog 内部 button/inputno-drag 后发现 dui(某鹅厂组件库)会直接在 body 下生成 DOM 节点,哪怕设置上了 dui-* 这样的通配符都没用,在 Windows 上点击事件还是穿透了组件,只好给整个内容的区域都打上了 -webkit-app-region: no-drag

弹出超出 Window 的菜单

官方做法
设计觉得 Windows 下不好看,于是要自定义 BrowserWindow

1
2
3
4
5
6
7
8
9
10
11
// main-process 打开弹窗
import { BrowserWindow } from 'electron'

function openMenu(x, y) {
const menu = new BrowserWindow({ x, y })
menu.loadUrl(`file://${__dirname}/menu.html`)
menu.on('did-finish-load', () => {
menu.show()
})
}
ipcMain.on('open-menu', (event, x, y) => openMenu(x, y))
1
2
3
4
5
6
7
8
9
10
11
12
13
14
15
16
17
18
19
// renderer 渲染进程捕获触发元素
import { remote } from 'eletron'
import React, { useRef, useEffect } from 'react'

export default function App() {
const btnRef = useRef()
useEffect(() => {
const window = remote.getCurrentWindow()
const { x: windowX, y: windowY } = window.getBounds()
const { x: elX, y: elY, height } = btnRef.current.getBoundingClientRect()
const x = windowX + elX
const y = windowY + elY + height
ipcRenderer.send('open-menu', x | 0, y | 0)
})
return <div>
content...
<button ref={btnRef}>点我出菜单</button>
</div>
}

其中

1
ipcRenderer.send('open-menu', x | 0, y | 0)

非常重要 😂 因为 Electron 打开 menu 的 x & y 只认整型,而 getBoundingClientRect() 返回了浮点数,直接用就崩了……

区分「开发时」「编译时」和「运行时」

跨端开发的优势就是 Write Once, Run Everywhere。代码能贴近运行时判断就贴近运行时判断,不过为了开发和打包大小,有如下几个优化思路。

  • 跨端开发 UI 需要调试查看其他端上的状态,所以会需要一个全局的样式开关,目前只区分了 macOSWindows,写作
    1
    2
    // constants/setting.ts
    const useMacStyle = process.platform === 'darwin'
    开发时只需要按需加 ! 取反就可以方便切换样式了,process.platform 是啥?这就是编译时了。
  • 编译时需要确定目标对象,一般会写成不同脚本或者是一个脚本里根据 platform 分发并写入进程参数,为了锁死各种依赖关系,假设某处写了 process.platform === 'darwin 如果 platform 不符合就会直接剪枝掉后面的部分。
  • 而运行时就广泛得多,比如关闭所有窗口时默认退出 App。
    1
    2
    3
    4
    5
    6
    7
    import os from 'os'
    import { app } from 'electron'
    app.on('window-all-closed', () => {
    if (os.platform() !== 'darwin') {
    app.quit()
    }
    })
    再比如根据系统类型开启不同的提示文本,这些都需要运行时判断,虽然也可以直接编译时判断,但终究不够灵活。

__结论__:类似于配置下发的流程,如果是偏开发侧的内容可以在一处统一管理,如果是偏向本地系统的功能可以根据实际运行环境开闭,做到尽量少依赖于编译时以求在多端最大化复用代码逻辑。


To be continued……

格式化与验证

众所周知,前端很大程度上就是做数据的展示和收集工作,这时候用户看到的内容和服务端存储的数据中间就会有多层转换过程。

最重要的当然是 money 啦,相差一分钱都能让用户急得哇哇大叫。比如业务里有三种价格:

  • fixed_price 原价
  • promotion_price 特价,一般为 fixed_price * promotion.discount
  • vip_price 会员价,一般为 fixed_price * vip.discount,可能为空

经常出现的情形时既要显示折扣(discount)又要显示价格(promotion_price or vip_price),可不可以直接返回 fixed_pricediscount 呢?不可以!细心的读者已经觉察到问题了 —— discount 为小数,fixed_price 与其相乘很可能不是一个整数(这里要插一句,一般情况下价格都是记录为 int,以 cent 作为单位)。比如臭名昭著的 JavaScript 浮点数相加问题。

1
2
3
4
> 0.1 + 0.2
< 0.30000000000000004
> 0.1 + 0.2 === 0.3
< false

原因就是 float 在计算机里存了 32 位,1 位符号位 + 8 位指数位 + 23 位尾数,反正就是不精确就完事了。那我们即使不精确也要保证各处拿到的是一个值,这个值只能以后端为准。

1
2
3
4
5
6
7
8
9
@property
def promotion_price(self):
promotion = self.get_active_promotion()
if not promotion:
return self.fixed_price

if self.is_chapter:
return int(self.fixed_price * self.column.promotion_discount)
return promotion.price

这个值是惰性的,也就是说只有用到时才会计算值,返回的一定是一个整数。有一些应用场景:

  • 直接展示价格:(price / 100).toFixed(2) => 0.99
  • 很多章节合并购买,items.reduce((total, item) => total + item.price, 0) 注意这个值可能会不等于整本的定价,这时就要引导或劝说用户直接买整本更划算呀
  • 满减活动,类似合并购买情形,只不过是有一些阈值情形
    1
    2
    3
    4
    5
    6
    7
    8
    9
    10
    11
    12
    13
    14
    15
    16
    17
    18
    19
    20
    21
    22
    23
    24
    25
    26
    27
    28
    29
    30
    31
    32
    33
    34
    35
    36
    37
    38
    39
    40
    41
    42
    43
    44
    45
    46
    47
    48
    49
    50
    51
    52
    53
    54
    55
    56
    57
    58
    59
    60
    61
    getMaxAvailableRebateAmountInGroup = (group) => {
    const total = this.getTotalPriceInGroup(group)
    let maxAmount = 0

    if (!group.event) {
    return maxAmount
    }

    group.event.availablecouponGroups.some((coupon) => {
    if (total > coupon[0]) {
    maxAmount = coupon[1]
    }
    return total > coupon[0]
    })
    return maxAmount
    }
    /**
    * Returns rebate threshold info.
    * @param {Object[]} couponGroups - Available coupons.
    * @param {number} couponGroups[][0] - The threshold of coupon.
    * @param {number} couponGroups[][1] - The amount of coupon, will be reduced from price when total meets threshold.
    * @param {numer} total - Total of prices.
    * @returns {[string, bool]} Description String, isMaxThresholdMet
    */
    // returned value: [descString, isMaxThresholdMet]
    getRebateThreshold = (couponGroups, total) => {
    const mf = moneyformatShort


    if (couponGroups.length === 0 ) {
    return ['本活动满减券已全部用完', true]
    }

    for (let i = 0, prev_threshold = 0, prev_amount = 0; i < couponGroups.length; i++) {
    const [threshold, amount] = couponGroups[i]

    if (total >= threshold) {
    if (i === 0) {
    return ['已购满 ' + mf(threshold) + ',已减 ' + mf(amount), true]
    } else {
    return ['已减 ' + mf(amount) +
    ',再购 ' + mf(prev_threshold - total) + ' 可减 ' + mf(prev_amount), false]
    }
    } else {
    if (i === couponGroups.length - 1) {
    return ['购满 ' + mf(threshold) + ' 可减 ' + mf(amount) +
    ',还差 ' + mf(threshold - total), false]
    }
    }
    [prev_threshold, prev_amount] = [threshold, amount]
    }
    }

    getTotalPriceInGroup = (group) => {
    return group.itemList.reduce((total, item) => {
    if (item.onSale && item.selected) {
    total += item.salePrice
    }
    return total
    }, 0)
    }

钱的计算大概就是这样,涉及到第三方支付就更头疼了。

时间

金钱是宝贵的,时间是更宝贵的。而我们需要根据不同场景甚至用户所在时区去显示不同的时间格式,有一种方案是 date-fns,项目里也有根据 timestamp 转换成用户可读格式的各种函数,但有时候只是想简简单单显示一个时间,同时考虑各种情况下的复用性。上 GraphQL

1
2
3
4
5
6
7
8
9
10
11
12
13
import time
from libs.utils.date import mtimeformat
from ..types import TimeFormat

def format_time(time_, format=TimeFormat.FULL_TIME.value):
return {
TimeFormat.FURTHER: mtimeformat(time_),
TimeFormat.FULL_TIME: time_.strftime('%Y-%m-%d %H:%M:%S'),
TimeFormat.FULL_DAY: time_.strftime('%Y-%m-%d'),
TimeFormat.CHINESE_FULL_DAY: time_.strftime('%Y 年 %-m 月 %-d 日'),
TimeFormat.ISO: time_.isoformat(),
TimeFormat.TIMESTAMP: int(time.mktime(time_.timetuple()) * 1000),
}[format]

其中 TimeFormat 是一个 GraphQL 的 enum 类型,mtimeformat 是一个可以根据相差时间来区别展示的函数,比如可以展示成「刚刚」「5 分钟前」这样的口语化格式。

实际效果

表单

表单的验证可以有很多实现,最简单的莫过于 maxlengthrequire 这种,直接交给浏览器,项目里也用到了一些 jQuery 的表单绑定,在提交之前一次性遍历表单项根据 data-* 来进行 check。

现实是 react 相关的表单验证有以下两个痛点:

异步验证

所幸的是 formik 支持了 Promise 的验证结果

1
2
3
4
5
6
7
8
9
10
11
12
13
<Field name={name} type="number"
validate={function(value) {
return fetchAgent(value).then((res) => {
if (res.agentExisted) {
if (res.existed) {
return `该作者经纪合同已经存在,负责人:${res.editorName}`
}
} else {
return `'作者 ID' 为 ${value} 的用户不存在或不是作者身份`
}
})
}}
/>

依赖另一输入

1
2
3
4
5
6
7
8
9
10
11
12
13
14
import * as Yup from 'yup'

const OTHER_NATIONALITY = '其他'

export const validationSchema=Yup.object().shape({
nationality: Yup.string().nullable(true).required('请选择国家或地区'),
otherNationality: Yup.string().test(
'need-other-nationality',
'请填写其他国家或地区',
function(value) {
return this.parent.nationality !== OTHER_NATIONALITY || !!value
}
),
})

实际情形为中间的输入框依赖于前面的下拉筛选框是否选了「其他」

路由

异步鉴权路由

1
2
3
4
5
6
7
8
9
10
11
12
13
14
15
16
17
18
19
const PrivateRoute = ({ component: Component, ...rest }) => {
const user = useSelector(state => selectors.user(state))
const isLoaded = useSelector(state => selectors.isLoaded(state))

return (
<Route
{...rest}
render={(props) =>
!isLoaded ? (
<></>
) : user ? (
<Component {...props} />
) : (
<Redirect to='/404' />
)
}
/>
)
}